So now you’ve been introduced to the plane, the run-up, and had a brief look at the instrument panel. The next step is to start to get a “feel” for the airplane and deeper insight into some of those instruments. At low speeds, the airplane shimmies, shakes, and feels like it’s going to fall to pieces at any moment. However, as the air starts flowing around the wings and body and it leaves the earth, the shimmies cease and the plane feels solid and strong.
The last post, Flight Training 101, left us sitting at the end of the runway, run-up complete and ready for take-off. We’ve announced on the radio that “we’re taking the runway”. Now to touch those handles I told you I liked so much. The mixture handle controls the fuel-to-air ratio and where you set it is based on density altitude. Density what? This is where the elevation of the airport and air temperature comes in. Flying out of a mountain airport, you have to correct for elevation and non-standard temperature, (it’s a big ole formula with lots of input) so we set the mixture, put our hand on the throttle, and depending on what kind of take-off you’re doing for training, (short field, soft field, etc.) you can start adding power.
Before you even get in the airplane, you’ve had to do a lot of prepping to do. Checking the weather is very important. Even if it’s clear skies, you need to know wind direction and speed. Airplanes always take off and land in to the wind. When runways are constructed they build them for the prevailing winds of the area. For instance, my home airport had runways 26 and 08. Those numbers correspond to compass degrees, runway 26 is 260 degrees (W), and runway 08 is 080 degrees (E) on the compass. When it gets a little hairy is when the wind decides to come from “ the side”, a cross-wind. And yes, that’s a big part of flight training and one of the reasons I failed my first check ride, you’ll hear about that later. Oh wait where was I… oh yeah, we’re getting ready to add power and leave the ground…
Airspeed Indicator
So the first thing is to add power nice and easy. You don’t want to just shove or slam it forward, as the airplane builds speed rolling down the runway, the shimmy is at its worst, but as the air flows over the wings, the plane begins to feel lighter begging to fly. But if your airspeed isn’t there you have to keep her on the ground. And now we introduce the first instrument, the airspeed indicator.
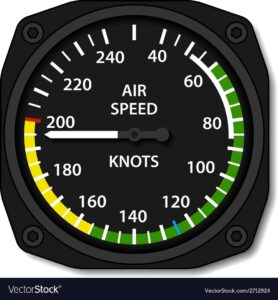
Depending on the airplane, your needed take-off speed will differ. But the manufacturers have made it pretty simple, you have to be in the green to achieve flight, and you really don’t want to spend too much time in the yellow, and red is pretty much a no-no. The speeds are based on structure and stress that you can safely put on the airplane.
As you inch towards the green, you’re also keeping the plane in the center of the runway with the rudder pedals and looking out the windshield. It’s not as easy as it sounds, the airplane wants to go all over the place, the wind pushing it to one side or the other. If you add too much of one rudder, you tend to over-correct by pushing the other rudder, (they call this “dancing on the pedals”, and I danced and danced) and the cycle keeps going until you find the right amount of pressure and “feel” to stay straight. You’re also keeping an eye on your “go-no-go” place on the runway. Runways are different lengths and there’s an imaginary line that you pass and you need to be at a certain speed to know whether you can take off or abort the take-off. if you decide to abort you’ve got to kill the power quick. I’ve got a story about that I’ll also share…
We are a go for take-off, the speed is continuing to build, we’ve got the required speed to continue the take-off, and the airplane is begging to take flight. A seasoned pilot can pull the airplane off the ground with his or her fingertips. But as a student pilot, I have both hands on the yoke and holding on so tightly the whites of my knuckles are showing. Just like the throttle, you ease the yoke, if you pull up too hard and quick the airflow on the wings changes and you lose altitude instead of climbing…which in basic terms, is very very bad! On that note, there is always a fence at the end of the runway, at most small airports it’s a six-foot fence, so in theory, you only need to be up 6 feet to clear the fence at the end of the runway. But that’s not a real good situation to be in either, so the higher you get on take-off the better. To make the airplane gain altitude, you’ve got to hold the nose, (think of the prop cover as the nose), slightly down. Which continues to increase your airspeed and you can keep easing the yoke back to climb. If nothing else, remember, the more space between the plane and the ground the better.
Altitude Indicator
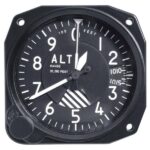
Now to introduce the next important gauge. The Altimeter. Simply put, tells you what altitude you’re flying at. When you check the weather before your flight you’re going to get a barometric pressure number, which is the little dial inside. That is so you can have an accurate reading of altitude. So, for example, If my home airport is at an elevation of 6,750′, checking the weather will give me a number to turn the dial to, and that should put the “big” hands at or around 6,750. (depending on air temperature…that density altitude stuff again). But that’s the basic idea. You need to be at a certain altitude for pretty much everything, like airspaces restrictions, and flight planning, ATC will tell you to climb, descend, or maintain a certain altitude. Overall message = altitude is very important.
Vertical Speed Indicator
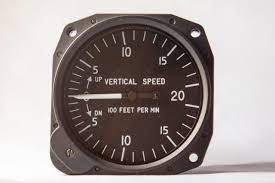
The Vertical Speed indicator goes hand in hand with the altimeter. This instrument shows what your climb or descent rate is in feet per minute. In the simplest terms, this instrument tells you if you’re going up or down. I know, you’re thinking…won’t I know if I’m going up or down, and the answer is sometimes, you don’t know? Air currents are not visible and as the wind moves around on the surface it creates updrafts and downdrafts you can’t see. Thunderstorms have updrafts and downdrafts surrounding and inside them. If you’re flying under IFR (Instrument flight Rules, meaning you’re trained to fly in the clouds) you can be inside a thunderstorm and not even realize it. We once flew from California to Arkansas, we were flying in the clouds, and although we didn’t feel a thing we were climbing at over 2,000 feet per minute. The only way we knew, was this little instrument here. As a side note, shortly after we descended about 2,000 feet per minute. We call those “elevators” and you just ride the ups and downs, making sure there’s enough altitude nothing bad happens.
Heading Indicator and Compass
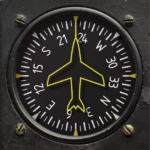
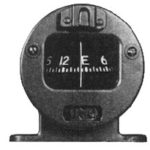
Direction is very important when flying, besides needing to know which way you’re going, you’ll hear non-stop heading instructions based on the degrees on the compass. I spoke earlier about how Runway numbers are actually degrees. The best directional instrument is the Heading Indicator and it’s mounted in the dash like this one here, but the airplane I learned to fly in had a liquid/ball style compass on the top of the dash. It worked but your brain had to work a whole lot harder remembering the opposite degrees, etc. The heading indicator makes life a bit easier when planning turns, turning to a specific heading, and maintaining a direction. Although it can be prone to errors, it has a knob that you’ll turn so it matches the compass, and need to check accuracy roughly every 15 minutes. If the instructor tells you to turn to 330 degrees you can see where it is and which way to turn to get the plane to that heading. It is amazing how quickly you can move 10-15 degrees one way or the other, staying on the constant heading takes practice and a light touch. Similar to staying in the center of the runway, you can correct and over-correct like crazy.
Attitude Indicator and Turn Coordinator
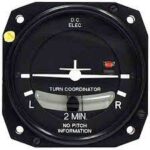
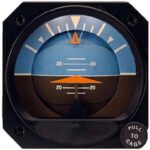
For flight training specifically, these little instruments, the Attitude Indicator, and the Turn Coordinator will be your best friends. They should be called, “don’t make yourself or your passengers sick” coordinators. Don’t be fooled, the attitude indicator is not measuring your mood or how you feel, it’s all about the plane and its being in time and space. The turn coordinator makes sure the tail of the airplane is following the nose of the airplane. One of the many maneuvers you’ll practice is turns about a point. You pick a spot on the ground, put the tip of your wing on it, and steer the airplane with the yoke and the rudder pedals, keeping your wing tip on the object, adjusting for the wind that moves you around, and not losing altitude while doing it. The lines are degrees of turns, the blue representing the sky, and the brown earth. It helps the pilot keep the airplane at a constant rate of turn so you’re not all over the place, turning too shallow or too steep. Steep turns are a great way to make yourself and your passengers a little air-sick, but they can be a lot of fun too. We will cover those “ground” maneuvers in the next post.
There are many other buttons and knobs on the instrument panel, but these are really the ones that need the most attention. The radios and frequencies are also important, and we’ll get to those. So, sit back and relax, we’ve taken off and the fun has only just begun.