Learning to fly in Southern California is a daunting task, you have mountains, a couple of international airports, Air Force bases, and about 1,000 small airports scattered around. As a student pilot, it’s important to find an area to practice maneuvers without being in an airway, airspace, or in danger of hitting terrain. Luckily the flight instructors know where such an area is just right of out the mountain valley to the east, the terrain falls away and the landscape turns to desert. A perfect place to really get to see and feel what the airplane can do.
After take-off, we climb to the altitude that will safely get us over the eastern mountain ridge. My hands had finally stopped sweating and I even let up my death grip on the yoke. As the terrain fell away the view of the ground and the surrounding area seemed endless. In my head, I heard The Who song, “ 🎶 I can see for miles and miles and miles and miles…oh yeah 🎶”.
Today we were going to learn some flight maneuvers. Most flight maneuvers are lessons learned for the bigger goal, getting back to the ground safely. How do you get back to the ground safely? By learning how to land of course. Slow flight and stalls are major components of landing that you can first learn in the air.
Slow Flight
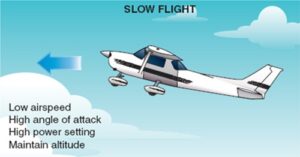
The very basic idea of slow flight is to put the airplane in such a position that you get down to the slowest airspeed possible without falling out of the sky. You need to learn how the airplane acts, how the controls feel, and what the attitude of the airplane is. This is important for take-offs, landings, and possible go-arounds. On landings, as you make your final approach to land and you’ve pulled back the power and you need to slow the airplane down to the safe touch-down speed.
We’ll cover some more when we talk about actually landing, but for now, it’s just about fun burning holes in the sky. One of the first things you need to do is perform “clearing turns”, a doughnut in the sky. We want to make sure there aren’t any other airplanes or hazards where we’ll be practicing.
Now we know we are clear, we’ll slowly pull the power back while slowly pulling back on the yoke to raise the nose. You’ll notice I say slowly or carefully all the time, and it’s not for a lack of vocabulary or searching for words, it’s really about smooth movements on the controls, it’s not very often, that you’ll shove, jam, or make abrupt moments with the controls. There will be times, like realizing your landing is going to be bad so you add full power fast, and yes I had that happen too…(but that’s for later).
For now, we’re making slow, smooth movements. Just for the record, most students pilots don’t do anything slow and smooth, and I was no exception. I’m really surprised the instructor didn’t get sick with all the jerky movements I did. Where were we… oh yeah, we’ve pulled the power back, raised the nose and we need to get the airspeed lower to add flaps. Wait… what are flaps? Flaps are a “fin” on the backside of the wings that lock into place at different degrees to induce drag. Simply put, drag slows the airplane down, and remember our goal is to get as slow as we can. There is a specific speed called Vfe which is the maximum speed you can be at to extend the flaps without damaging the plane. If you remember the airspeed indicator from the last blog, the white arch, is the speed “zone” you can lower the flaps.
It is becoming difficult to share all the ins and outs of flight training without getting over technical. There is so much you learn during ground school like what is CG, Vx, Vy, and what the heck am I saying when I talk about yaw and angle of attack? I am going to try to keep it simple for the non-pilots, but I’ll try to include more links so if you want a further explanation, it’ll be easy for you to find.
My first attempt at slow flight was rough. The instructor says, “pull some power”, well, of course, I pulled it back too far, I knew this because the engine sounds like it wants to die, it started sputtering. The Instructor says, “nope too much add it back in”, he added power back to about the middle faster than my brain could even process what he had just said. So ok, the first lesson only pulls the power about halfway back for now. The next instruction is to gently raise the nose, I pulled the yoke back too much and we looked like we were trying to fly to the moon. the instructor says, “nope too much push it back down”, and again he had already moved the controls at lightning speed. However, when you pull the nose up as I did, you’ll also hear a loud buzzing, and a red light comes on the dash! This is normal to hear and see on landing right about when the airplane wheels touch the ground, but not a normal thing during flight. Ok, the second lesson don’t aim for the moon. I’m not going through the entirety of the slow flight process, or this blog may never end, also I learned to fly over 21 years ago, (yes they had planes waaayyy back then) and I may not remember every detail, just the memorable times.
Although I did get better, after instruction and practice, creating the slow flight configuration actually became a lot of fun. I did get smoother movements with the controls and became obsessed with maintaining altitude as closely as humanly possible. I think that was one of the appeals for me in learning flight maneuvers, I love getting the precision of the maneuver down. Of course, first, you have to learn what to do, and then you have to practice, practice, practice. As I learned, I really aimed to hold heading with less than 5 degrees deviation, hold altitude within 50 feet or less, maintain the perfect degree of the bank through the entire turn, and so on. For the check-ride, there are minimums you cannot exceed to pass the flight portion, but I wanted to be even better than that.
Stalls
Learning slow flight and stalls are building up to learning how to land. As much as we love flying, sooner or later we’re going to have to land. Think of it as an absolute, like what goes up must come down, or a certainty like death and taxes. So it’s all about how “gracefully” you come back down. As a student pilot, barely anything is “graceful”, especially learning to land. But, I digress, back to stalls… you learn both power on and power off stalls.
There is a point in slow flight that the airspeed has gotten slow enough you actually have to add power back in to maintain altitude, remember the more space between you and the ground the better. I hadn’t discussed how the propeller turning actually causes the plane to go to the left, so you need to get used to adding a little right rudder all the time. That feels a little worse at slow airspeeds and high power settings.
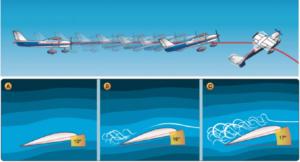
So now, our airplane has lots of power but because we have our nose up and flaps down, the airplane feels a little “mushy” and a little harder to control, because we changed how much drag we put on the airplane. The only time we should have the airplane looking and feeling this way is right before we touch down for landing. While you’re concentrating on adding the right rudder, trying to maintain altitude, and the controls are feeling “mushy”, you should also hear a buzzer and/or see a red light pop up on the dash. And that my friend, is basically a power-on stall. This is super important for those moments you need to do a go-around, if you’re coming in for a landing and something, well anything, isn’t right, you may need to add power and get back up in the air. If you’re in this same landing configuration, even if you’re at full power setting you won’t climb, you could stall, and come right back down, possibly crash landing. That’s why knowing how to recover from the stall is equally as important.
So, now in the practice area, we have stalled the airplane, as apparent by the buzzer, red light, and “mushy” controls, now we need to recover. Recovering is actually resuming a “positive rate of climb” by increasing airspeed. So by simply pushing the nose of the airplane back down, and reducing drag by taking off the flaps one setting at a time the airplane recovers very quickly. Believe it or not the airplane really just wants to fly. With the nose down, and flaps off, you can return to flying straight and level at normal power settings.
There are other variations to slow flight and stalls, but I think you get the basic idea. It took many flight hours of practice to get these maneuvers nice and smooth and check-ride acceptable. There are also “ground reference” maneuvers to learn as well, like S-Turns across a road, turns around a point, and rectangle patterns. Those maneuvers let you feel and understand how the wind influences the airplane and how it tracks across the ground. Now it’s time to head back to the airport, enter the pattern, and land for the day.