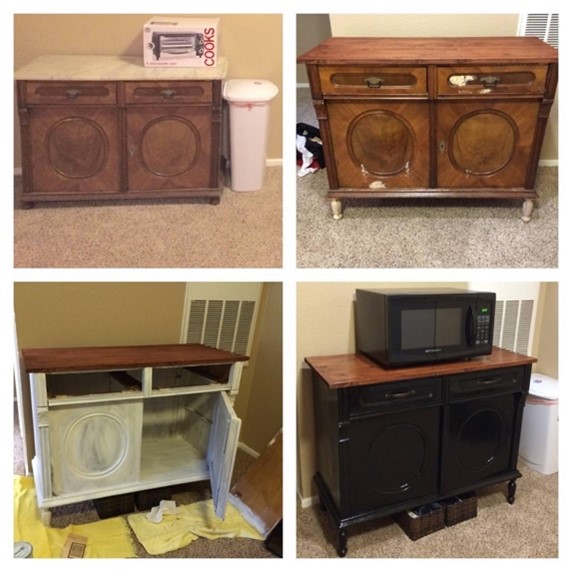
After I separated from Mike S, I moved into a little 1-bedroom apartment and because the boat had “built-in furniture, I had to start collecting items to furnish the apartment. Thankfully, I had a few friends that had extra pieces they wanted to part with and condition didn’t matter because I could always upcycle. One of them was this little buffet, it had a broken marble top, and some cosmetic damage, but it was going to be a great piece since the apartment had very limited cupboards and not one kitchen drawer. I have always loved the look of wood. However, the vainer that covered the buffet was dinged, peeling, and missing in some small areas, so I knew I would have to paint the entire piece. After I finally decided on a “theme” or look for the apartment, I went to work to tie the buffet into the theme.
First, I removed the broken marble top, went to Home Depot and got a basic pre-made wood countertop, it was also a bit short so I bought some new legs. I stained the countertop with a basic cherry color thinking that would off-set the black nicely. I was a bit confined in what I bought, and how I did projects, as I didn’t have a garage, workshop, or a variety of tools. Sanding, painting, etc. all had to be done inside and not leave any lasting damage to the walls, carpet, or bother the neighbors too much.
Secondly, I bought some wood putty to fill in for the missing vainer, smoothed and sanded it to match. The putty didn’t turnout as well as I liked, but only close inspection would reveal the imperfections. The legs were easily installed by un-screwing the old ones, and screwing the new ones in.
Next, I put paint primer on the entire buffet, inside and out. I would have like to do more sanding, but between the noise and the dust, I opted for a couple coats of primer instead. I did remove the drawers and doors to be able to get every surface. While the primer was drying I put the first coat of lacquer on the top to help seal it from future use. I think when all is said and done I applied five coats of lacquer. Just a little side-note here. Make sure you have some good ventilation when using lacquer, the fumes can go straight to your head.
With a couple coats of lacquer and the primer dry, I choose my black paint and started applying it slowly. I used a variety of brushes to make sure I got into all the crevasses as I watched for drips, and made sure not to get any on the carpet. I can tell you these kinds of projects are much more enjoyable to do in a garage or workshop.
Once I was happy with the black paint, I added some basic cupboard contact paper to the insides of the drawers and below on the “floor” and shelf. Ta-da, it was like a brand-new piece. It worked very well for me for the, almost 5 years, I was in the apartment. It also worked well for another couple years in the new house until it was just recently replaced.